Article translated from Chinese blog:http://blog.omitol.com/2017/09/30/Bypass-QCOM-Secure-Boot/
The article briefly analyzes Qualcomm’s security guidance mechanism and succeeds in bypassing its security guidance mechanism in the comprehensive vulnerability of a machine in Xiaomi, so as to achieve the goal of freely modifying the system partition.
Android safe boot process and composition
Android safe boot process
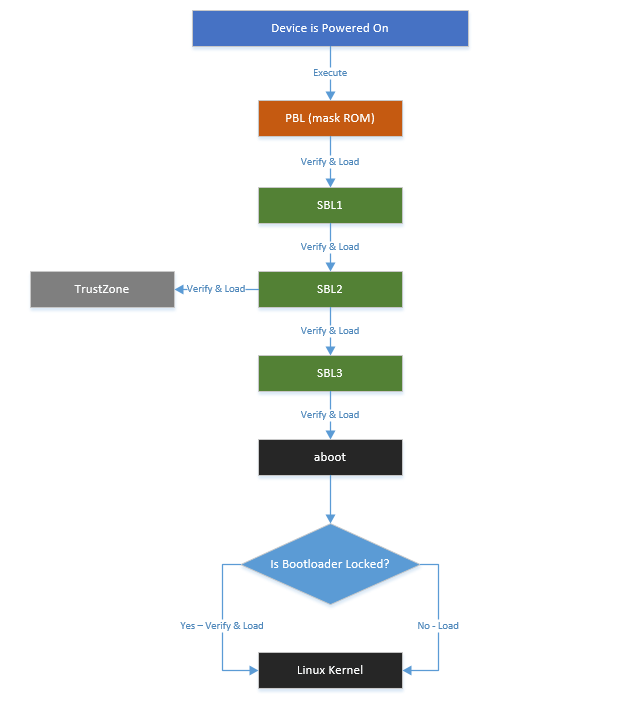
An Android device is composed of hardware and software, when the power button is pressed the system from hardware to software, into the final into the Android system, is a complete boot process. Take Qualcomm as an example, in a conventional boot process, the CPU boot code PBL (Primary Boot Loader, similar to the BIOS of the x86, sometimes also known as BootROM) is executed from a predefined place (solidified in ROM) Qualcomm done after burning in the chip, can not be changed, is RoT (Root of Trust, root of trust). Use the root public key programmed in the fuse to verify and load bootloader SBL1 (Secondary Boot Loader), jump to sbl1 execution, SBL1 load verify APPSBL (aboot), and finally APPSBL load verify the boot partition [1]. After the kernel starts, the integrity of the system partition is verified by the dm-verity [2] function module in the kernel. This completes the entire system security guide. The whole process shown in Figure[3]:
Currently Android a complete verification process is divided into two parts:
- A branch is the official verified boot by the kernel dm-verity to ensure that the system partition has not been tampered with
- The other part is to verify the integrity of the final boot image for a secure boot of the boot loader for different devices. Together, these two parts establish a chain of trust verification from the bootloader to the system image
Android security boot components
Bootloader security boot
This process is a safety certification check chain, are loaded from the previous stage of the program to verify the next stage of the implementation of the program, through the signature verification mechanism to ensure that the system is not subjected to any form of tampering, only the implementation of manufacturing Firmware. This process is device-specific and is usually “burned” (written to write-only memory) into the device by using a hardware-specific key that can not be changed. This key is used to verify the integrity of each level of the bootloader to the final boot image.
Qualcomm bootloader is an open source project, you can see the code under the bootable / bootloader / lk Android code tree. Is written for a specific motherboard and chip, not part of the Android operating system. Because the SBL code is closed source, it is a complicated process to analyze. Papers in the analysis of boot loader safe boot process only from the beginning of APPSBL analysis.
Bootloader OEM manufacturers or operators to lock and limit the place. After the bootloader is locked, it is not allowed to modify the phone firmware or to brush the third-party system in a non-unlocked state. These limitations, which depend on OEM and operator specific decisions, may vary, but cryptographic signature verification mechanisms are commonly used to prevent devices from being fooled or executing code that is not legally signed. If you want to brush machine users need to unlock the bootloader. Now OEM will adopt a special mechanism, such as the need to apply to the official unlock code, after the application is unlocked code can unlock the device. After the device is unlocked, the bootloader will no longer sign and verify the boot and recovery partitions. That is, the bootloader will not be booting safely, allowing users to flash and clear user data.
Later chapters will also target Qualcomm’s LK signature and verification
Mechanism of anatomical analysis, study specific security measures, analysis of existing security flaws and hidden dangers.
Verified Boot
As of 4.4, Android supports the boot using the dm-verity feature in the Linux Device-Mapper [4] framework. Dm-verity was designed for block integrity checking and uses a cryptographic hash tree to provide transparent integrity checking of block devices. It verifies the integrity of each device block as it is read from disk and reads successfully if the block is checked out.
If not, the read will generate an I / O error as if the block was actually corrupted. Used in Android to protect the integrity of system-critical partitions such as a system partition or vendor partition. System partition is mounted as read-only mode, is no longer allowed to be mounted as read-write mode. The key used to verify the system partition is in the boot image’s ramdisk.
Later chapters of the thesis will also continue to analyze the specific implementation of Verified Boot on Android to study the existing security flaws and hidden dangers.
Android Security Booting Mechanism and Defect Analysis
Bootloader boot mechanism analysis
user keystore verification vulnerability mining
The Bootloader sequence is a specialized, hardware-specific program that executes when the device is first powered on (ARM device reset). Its purpose is to initialize the device hardware, provide a minimal device configuration interface, and then locate and start the operating system. Boot devices usually need to go through different stages, which involves a separate boot loader for each stage, this article only analyzes APPSBL (aboot) loading boot program. Android bootloader is usually a proprietary, system-on-chip SoC. Device and SoC manufacturers provide different features and levels of protection in their bootloader.
The integrity of boot.img is verified by aboot throughout the parity chain, and its open source LK can be downloaded from the Code Aurora Forum. There are two different keys available for verification in the LK:
- One is oem_keystore, is compiled into aboot, defined in platform/msm_shared/include/oem_keystore.h
- One is user_keystore stored in the keystore partition
Always try to use the OEM keystore during boot to verify boot.img and recovery.img. However, when the keystore partition is not empty, its signature is verified using the OEM keystore. If the verification is successful, the user_keystore is read from the inside and will be used to verify boot.img and recovery.img.
user_keystore contains the RSA public key used for authentication. Taking the CAF code LA.BR.1.3.2_rb3.14 branch as an example, the entire basic functions and logic execution are shown as follows:
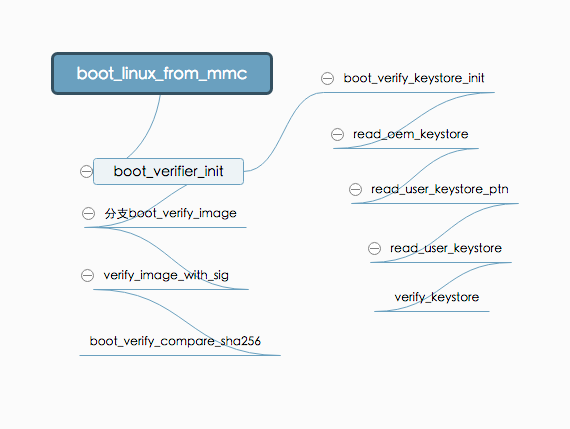
The final call to verify_image_with_sig () uses the public key in user_keystore for verification. The value of user_keystore is read_oem_keystore by boot_verifier_init
oem_keystore assignment user_keystore. Then verify the keystore partition, if the verification is passed, the partition data assignment user_keystore. This completes the user
the use of keystore
However, when verify_keystore is called in the read_user_keystor () method to validate the user keystore, the 385-line in the if-else judgment is missing curly braces, causing the user_keystore to be assigned regardless of whether the verification was successful or not. Specific code as shown:
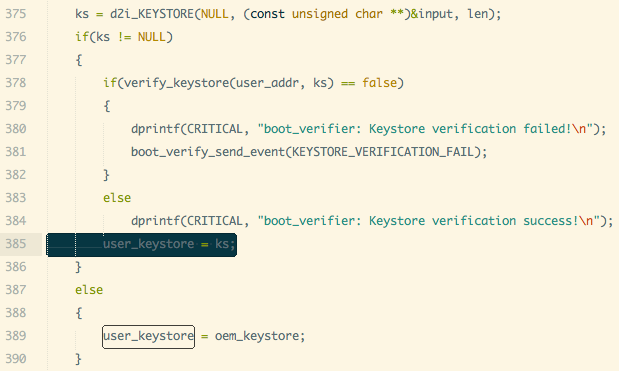
This creates a clear security hole, user keystore without the OEM’s signature can also be used to verify the boot or recovery mirror. We only need to sign our own signature generated keystore.img through other vulnerabilities written to the phone can bypass the safe boot mechanism.
¶ Protection analysis of unlock flag
Qualcomm’s partition table, there is a partition called devinfo, the size of 1024K. Its data structure is defined in app / aboot / devinfo.h, including is_unlocked unlock status flag bit; is_tampered tamper flag bit and so on. Obtain the relevant information through the fastboot oem device-info command.
When LK is started, it is read through aboot \ _init () -> read_device_info (& device) -> read_device_info_mmc (). If is_unlock is true, the verification is skipped and a flash command is allowed. After using fastboot oem unlock command, write_device_info_mmc (& device) to devinfo partition marked bit operation.
Qualcomm source code and for the mark bit encryption signature protection, directly modify the mark bit you can use to unlock the phone. However, in the realization of OEM, most of them will protect the partition, modify the partition name and the use of encrypted signatures and other means to ensure that the partition is not illegally tampered with.
However, the existence of Android fragmentation, manufacturer technology is uneven, there are still many devices did not modify the part, leaving a security hole.
¶ Qualcomm download mode analysis
Qualcomm has its own download agreement, usually in the production of the device through the agreement when burning firmware. In the lk code aboot_init, you can choose to go to a different mode by monitoring buttons, etc., such as recovery or
fastboot mode and so on. Default code when the volume down key at the same time, then enter the DLOAD mode, which is the download mode. Then through the Qualcomm proprietary sahara or firehose protocol tools for firmware update download [5].
Similarly in the kernel/drivers/ power/reset/ msm-poweroff.c relevant code by the macro CONFIG_MSM_DLOAD_MOD control can be turned on or off by adb reboot edl / dload command to restart into the download mode.
Qualcomm’s upgrade tools and protocols do not validate any firmware during the download process, and if the wrong or damaged firmware is downloaded, the device will be bricked. However, manufacturers to facilitate the development, production, sale and other needs, and will not completely shut down Qualcomm download mode, and some will leave a hidden interface to enter the mode.
Android Verified Boot
Dm-verity
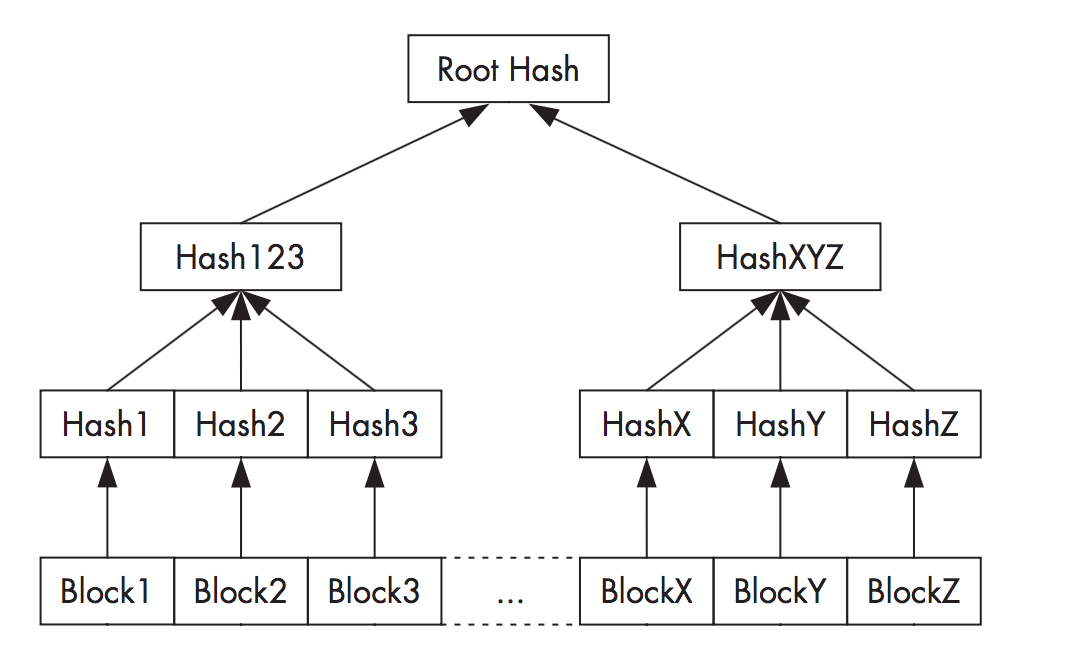
Dm-verity uses a cryptographic hash tree to provide transparent integrity checking of block devices, each block divided by 4k in size, with a SHA256 value. Each node in the tree is an encrypted hash, where a leaf node contains a hash of a physical data block, and an intermediate node contains a hash of its child nodes. Because the hash in the root node is based on the values of all other nodes, only the root hash needs to be trusted to verify the rest of the tree. Changes to any one node block destroy the entire encryption hash. The structure of the entire hash tree as shown:
Validation is performed using the RSA public key contained in the boot partition. The device block is checked at run time by calculating the hash of the read block and comparing it with the record value in the hash tree. If the values do not match, a read operation results in an I / O error, indicating that the file system is corrupted. Because all checks are performed by the kernel, the boot process needs to verify the integrity of boot.img in order to verify the boot process.
Partitions checked in Android are always mounted as read-only and can be changed only when the OTA block device is updated. Any other operation on the partition will destroy the integrity of the partition, such as root and other operations.
¶ Implementation in Android
The purpose of the Dm-verity device-mapper was originally developed for verification startup in the Chrome operating system and has been integrated in version 3.4 of the Linux kernel. It uses the CONFIG_DM_VERITY kernel configuration item to switch.
However, the specific implementation of Android and Chrome are different. RSA public key for authentication In the boot image ramdisk, the file name is verity_key, which is used to verify that the target device’s root
hash signature The verified target partition, with a metadata block containing the hash table and its own signature, is appended to the end of the mirror. If you want to enable verification of a partition, you need to add a verify tag to a specific device in the fstab file in ramdisk [6].
When this tag is detected during system startup, it is loaded with the verity_key public key to verify the last attached metadata for that partition. If the signature passes, File System Manager parses the dm-verity mapping table and passes it to the Linux device mapper, which uses the information contained in the mapping table to create the virtual dm-verity block device. This virtual block device is then installed at the mount point specified in fstab instead of the corresponding physical device. Therefore, all data read from the underlying physical device is transparently verified with a pre-generated hash tree. Any modification or addition of files to the device or even relocation of a partition as read-write results in integrity verification and I / O errors. Virtual device mount as shown:

However, because of the specific implementation, the RSA public key verity_key used for verification is placed directly on the ramdisk. This gives the possibility of replacing the public key file with an attack. And the target device is verified, but also directly to verify verify sign to judge, this is also a clear security flaw.
¶ Enable Verified Boot
In Google’s official document description, to fully enable the verified boot, in addition to configure the entire compilation system to open the relevant options, but also need to guide the boot loader to achieve the integrity of the boot image verification. The previous section has been analyzed for Qualcomm SoC implementation in this block.
AOSP source code, the development key includes the public key and private key, they build / target / product / security / directory. Used to sign the boot / recovery / system image, as well as to verify the authenticity metadata block table for the system partition [7]. Generate your own public-private key when enabled, but some model devices are still using the default key, which is equivalent to leading to the disclosure of the key, the device without any security at all.
Exploit testing and security hardening
Exploit vulnerabilities to bypass secure boot
Attack method design
In the previous chapter, we analyzed the existence of security flaws and vulnerabilities. Use the self-signed user keystore and boot / recovery image, and remove the verify flag for the system partition in ramdis k of the boot. Or replace verity_key in ramdisk and sign the system image. Brush written to the phone, you can achieve around the safe boot mechanism for some models, the device is free to modify.
However, when the device is in the LOCKED state, it is unable to write through fastboot. However, OEMs generally reserve their own download modes, such as Samsung’s ODIN and MediaTek’s SP Flashtool. The Qualcomm SoC is analyzed in the previous chapter dload / edl mode, the mode in the firmware image download process does not do any verification, can be directly written into the brush.
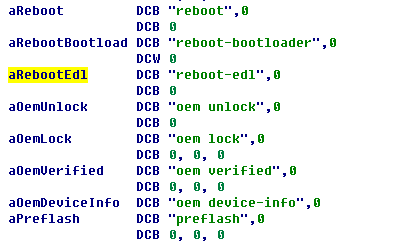
This test machine is red rice Note3 full Netcom version, the system version is V7.2.3.0, Android version 6.0, internal development code kenzo. Kenzo after several upgrades, gradually closed the button to enter, adb reboot dload / edl restart into the download mode, opened the dm-verity, to protect the phone is not cracked and brush machine. But by IDA
Pro Back Analysis emmc_appsboot.mbn in the aboot Partition reboot-edl was found when the bootloader image was mirrored. as the picture shows:
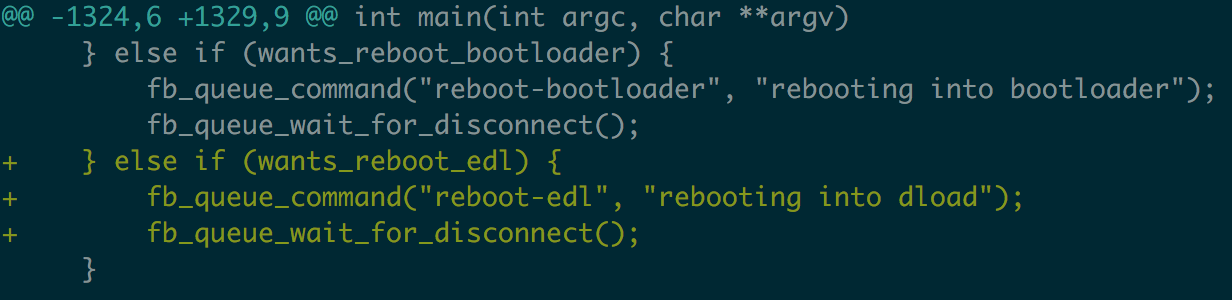
As its name suggests, the standard fastboot protocol does not support this command, for which you need to modify the fastboot source. fastboot source code in the AOSP source tree system / core / fastboot. Analysis of fastboot source, the command is finally sent to the bootloader by fb_queue_command, modify the code to add support for the command. Then you can successfully restart to edl mode. The core code example as shown:
Exploit testing process
The entire testing process is to verify the relevant security vulnerabilities discovered after the analysis and study of the security bootstrap mechanism in this paper. When the device is in the LOCKED state, the device is tampered with and modified, and the Android security boot mechanism is bypassed. The process is as follows:
- Generate their own public-private key pair
- Generate and sign keystore.img using public-private key pairs
- Repackage boot.img, remove the system partition verify flag
- Sign the boot.img again
- Use the modified fastboot, execute fastboot reboot-edl into the download mode
- Use emmcdl [8] tool to brush into keystore.img boot.img respectively
If the device can be successfully turned on, then that completely bypass Android’s security boot mechanism. System partition is not not mounted as a virtual device, but the real physical device block. as the picture shows:

Reference
- Tecent. Android系统典型bootloader分析
- Milan Broz. dm-verity: device-mapper block integrity checking target
- laginimaineb. Unlocking the Motorola Bootloader
- Red Hat Inc. Device-Mapper Resource Page
- CSDN. 高通 MSM8K bootloader 之二:SBL1
- Google. dm-verity
- CSDN. QualComm Android boot recovery vertify
- Github. emmcdl